Quick and Easy Lets Encrypt Certificates using Docker


Introduction
Let's Encrypt is an awesome service that appeared on my radar around the end of 2015.
Let’s Encrypt is a free, automated, and open certificate authority (CA), run for the public’s benefit"
Basically they provide free SSL certificates. Better yet they have made significant efforts to move away from more archaic domain validation techniques such as email (admin/tech contact) based and provide ways to validate using the hosted site and compatible web servers.
You can find out more in detail at https://letsencrypt.org/howitworks/
At the time of writing Nginx was not well/fully supported and this article demonstrates one way to generate certificates for use with any process (within reason).
Assumptions
This article assumes you are hosting one or more sites in containers on a host which is running Docker and that you wish to enable SSL on at least one of those sites.
Issuing a Certificate
There are other ways to request and manage certificates which you can read about at: http://letsencrypt.readthedocs.org/en/latest/using.html
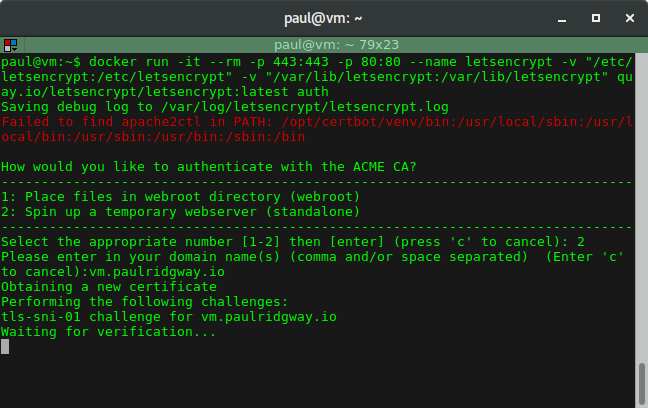
On the docker host serving websites run the following command:
sudo docker run -it --rm -p 443:443 -p 80:80 --name letsencrypt \
            -v "/etc/letsencrypt:/etc/letsencrypt" \
            -v "/var/lib/letsencrypt:/var/lib/letsencrypt" \
            quay.io/letsencrypt/letsencrypt:latest auth
Note: Port 80 & 443 are required so if you're running a webserver or nginx proxy they'll need stopping briefly first.
When presented with two options select the second to 'Spin up a temporary webserver':
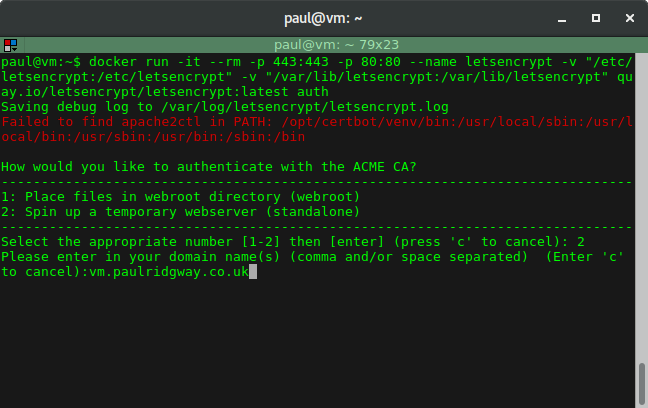
Then enter your domain (I used vm.paulridgway.co.uk here):
Note: The host entered must resolve in DNS to the host you are running docker on.
After that the automation kicks in and does the validation:
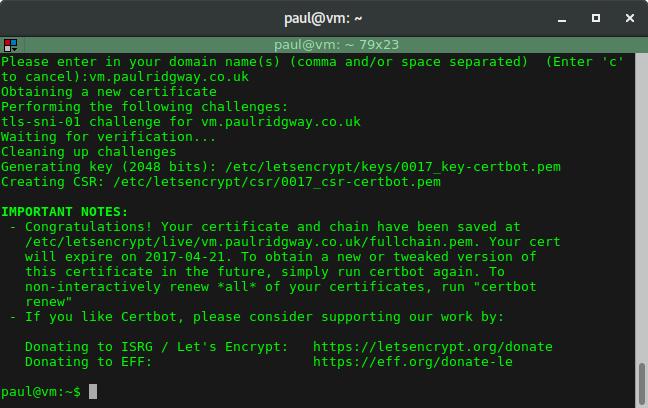
The output provides useful information including the key and certificate paths as well as the expiry date.
You can now re-start anything that was running on port 80 and/or 443.
The certificates, keys and other bits are all stored in /etc/letsencrypt on the host machine. For example my blockdev.io cert and key can be found at /etc/letsencrypt/live/blockdev.io/fullchain.pem and /etc/letsencrypt/live/blockdev.io/privkey.pem respectively.
Using them with Nginx Proxy
Thankfully Let's Encrypt is extremely helpful and provides the full chain file which is particularly helpful as I never end up remembering the chain order and often find the instructions online to be cryptic and unhelpful.
In my setup I am using the jwilder/nginx_proxy container which assumes responsibility for handling traffic on a standard port (ie 80) and mapping hosts to containers. It is also able to handle HTTPS and HTTP redirects to HTTPS.
In my docker compose YAML file I have the nginx_proxy container itself:
nginx_proxy:
  image: jwilder/nginx-proxy
  container_name: nginx_proxy
  hostname: nginx-proxy
  restart: always
  ports:
   - "80:80"
   - "443:443"
  volumes:
    - /var/run/docker.sock:/tmp/docker.sock:ro
    - /srv/certs:/etc/nginx/certs
The docker socket is 'mounted' in the container, as well as the path where I store SSL certificates: /srv/certs.
Reiterating the instructions on GitHub:
The certificate and keys should be named after the virtual host with a
.crtand.keyextension. For example, a container with VIRTUAL_HOST=foo.bar.comshould have afoo.bar.com.crtandfoo.bar.com.keyfile in the certs directory.
As my blog is currently the only site with SSL support I have:
paul@vm:~$ ls /srv/certs/
blockdev.io.crt  blockdev.io.key
So for my personal website (which does not use SSL) the compose YAML includes:
paulridgway_web:
  container_name: paulridgway_web
  hostname: paulridgway-web
  image: paulridgway
  restart: always
  links:
    - db:paulridgway_db
  environment:
    - VIRTUAL_HOST=paulridgway.co.uk,www.paulridgway.co.uk
nginx_proxy looks at specific environment variables to set itself up, so in this case I am telling it which virtual hosts to respond to, but everything else is default (port: 80, protocol: HTTP).
And for my blog I then have:
blog_web:
  container_name: blog_web
  hostname: blog-web
  image: ghost-blog
  restart: always
  links:
    - db:blog_db
  volumes:
    - /srv/containers/blog:/srv/ghost/content
  environment:
    - EMAIL_USER=top@secret.io
    - EMAIL_PASS=password1lol
    - VIRTUAL_HOST=blockdev.io
    - VIRTUAL_PORT=2368
This container doesn't listen on port 80, so as well as the virtual host(s) I have to specify the port too.
As stated above, nginx_proxy will detect the matching certificate for the virtual host and serve that through SSL, redirecting any HTTP requests to HTTPS.
Renewal
One small 'hassle' (security mechanism) is that the Let's Encrypt certificates are valid for a more limited amount of time (compared to a 'traditional' SSL certificate that you can purchase for a year, or two, or more). At the moment they last for 3 months, so you need an easy renewal mechanism if you're not using their automated tooling.
As the issuing process creates config files on the host the renewal process is quite simple, I use the following script to do it in one go:
#!/bin/bash

echo "Updating container image..."
docker pull quay.io/letsencrypt/letsencrypt

echo "Stopping nginx proxy..."
docker stop nginx_proxy

echo "Running update..."
docker run -it --rm -p 443:443 -p 80:80 --name letsencrypt -v
/etc/letsencrypt:/etc/letsencrypt -v /var/lib/letsencrypt:/var/lib/letsencrypt quay.io/letsencrypt/letsencrypt:latest renew

echo "Copying certificates..."
sudo cp /etc/letsencrypt/live/blockdev.io/privkey.pem /srv/certs/blockdev.io.key
sudo cp /etc/letsencrypt/live/blockdev.io/fullchain.pem /srv/certs/blockdev.io.crt

echo "Starting nginx proxy..."
docker start nginx_proxy
The script first pulls the latest container image for letsencrypt.
Note: Docker will do this by default on run but pulling before stopping the nginx_proxy minimises downtime as the proxy must be stopped for both renewal and for issuing the certificates which effectively takes your sites down.
Next the nginx_proxy is stopped.
Then the update process is run which is completely automatic using the same volume mounts where configurations were deposited during the issuing.
Finally it copies the newly issues certificates to the location expected by nginx_proxy and starts the nginx_proxy container again.